DIY Water Filter
Given the recent price increases, i.e. inflation, it is more important than ever that we keep an eye on spending our money wisely. Prepping is an activity that can consume a lot of money if preparations are made unwisely. This blog aims to bring really the best ideas to you on how you can prepare practically for serious events without wasting money. I’m also based in Germany so I’m not writing suggestions for annual events but rather more severe, once-in-a-lifetime events. It is therefore more important for us in Europe, that our preparations are made with forethought because otherwise our preparations would be wasted.
A satellite phone makes little sense for us because it would never be used and costs a lot of money. A cheap radio on the other hand may be a worthwhile investment because expenses under €100 usually won’t break the bank. So this is my approach and I hope you appreciate this frugal approach to prepping.
I’ve written about water before. I’ve also written about how one can make a water filter using products found in DIY stores and garden centres, or using items you may already have at home.
This time I’m going to look more closely to see if I can find a filter fit for the end-of-days that I could happily use on a daily basis, all while providing exceptional filtration. I will only briefly consider the alternatives because you may well be thinking some of the same things yourselves.
In part two of this article, I describe how I made my own Berkey style filter saving over €300 whilst using good quality parts; not plastic buckets! If you like, skip straight to my guide here.***
Brita Filter
Summary
- Poor quality filtration (unsuitable for dirty water)
- Short filter life
This first filter is one that every supermarket in Europe sells. They also sell filter cartridges, and you can get own-brand filters and cartridges even cheaper. They are very convenient and filter the water quickly. If you want to filter some water whilst guests are already sitting at the table, that is no problem, as a litre of water filters in under 5 minutes.
The problem with this sort of filter is the quality of the filtration. It is not guaranteed to get all of the bad stuff out of the water, in particular it cannot filter out parasites.
This is a problem when we’re preparing for a grid-down scenario. We cannot always rely on clean water coming out of our taps. A major regional flood will cause tap water to be unusable for some time. This type of filter cannot make flood waters or rain water drinkable. Combined with boiling it will, however, remove almost all of the contaminants and then the water would be drinkable.
So this cheap filter is an option when, and only when combined with a reliable heat source for boiling.
In order to use this filter it is necessary to keep on hand a good supply of filters as they are recommended to be replaced monthly, and you may want to replace them weekly if filtering dirty water.
Some further recommendations would be to pre-filter the water. Fill up a large container first, or as large as you have, and allow the sediment to settle to the bottom by leaving it for a few hours or days. Then take water from the top using a jug and filter through a pair of tights. I would probably then pass it through the filter jug and last of all boil it. Although boiling and then filtering should not make a big difference. The boiling kills the bacteria and the filtering removes the sediments.
Bottled Water
Summary
- Expensive
- Less durable
- Bulky
It is always recommended to have some bottled water on hand. Many Europeans only drink bottled water, despite our tap water being drinkable. This is largely the result of good marketing by the water companies and a desire to eat and drink as healthily as possible.
In terms of prepping it is not particularly healthy to keep water in plastic bottles long term. The chemicals in the plastic can leach out into the water. It would probably be safe in an emergency but there are other ways.
Glass bottles have other drawbacks. Usually, the water is more expensive, and if the disaster turns out to be an earthquake then it could well result in the glass bottles breaking.
Because of the convenience, and the increased likelihood of any disaster being short-lived and local, I’d still recommend keeping some bottled water in the house. Just for the off chance that freak snow causes a burst pipe and delivery problems to the local stores. Or another such event. Just don’t underestimate how much water might be required.
Approximately 2 litres per person per day. We’re a family of 5 and I’d expect two days tops for localized events. That is still 20 litres! But we can store that and cycle through it slowly throughout the year making sure none of it gets too old.
Berkey or similar
Summary
- Expensive
- Unattractive
- Good quality filtering
The Berkey water filters are well-loved by all preppers. And with good reason, they consistently perform well under test and they are widely available throughout the world. Here in Europe there’s another brand in Switzerland called Katadyne. Katadyne don’t tend to target the home user but their filters can absolutely can be used at home.
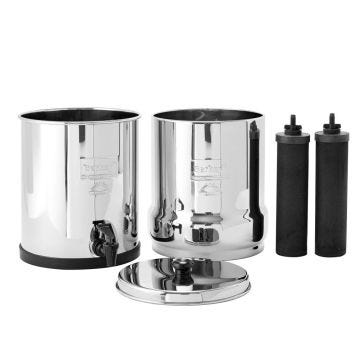
The Berkey and Katadyne water filters are gravity-fed carbon filters (the two black cylinders in the image). This is the important part of the overall filter system. Berkey have also thought about other important details. Off the shelf, the Berkeys usually come in stainless steel containers. This results in a long-lasting product that will not introduce contaminants into the water and will survive transportation or the occasional drop.
I do recognize some problems with it: Off the shelf, it comes with a plastic tap (spigot) and there is no level window, so you don’t know when it needs topping up. The exclusion of the level window is probably to make it stronger. You can buy one which attaches to the tap but this increases the cost significantly. Likewise, if you would like a stainless steel tap then that is also rather pricey, adding a stand to place it on making it easy to fill a glass, is again strangely expensive.
The good thing about the filters is that when filtering only clean water, e.g. tap water or good quality lake water, then the filter cartridges can last for up to 10 years. When you’re looking at close to €200 for the filters then factoring in the lifetime is important. Assuming we see the full 10 years then we’re looking at €1.70 per month which is comparable to the cheapest Brita-style filters.
Secondly, these filters (Berkey and Katadyne) are second to none for the quality of the filtration, removing pathogens and chemicals.
You’ll see later, that I chose to use the Berkey cartridges but in a way that is cheaper and, in my mind, better.
Zero Water
Summary
- Short filter life
- Not tested against pathogens
Zerowater™ has managed to get a lot of press in magazines or on YouTube. Their competition is clearly Brita with their website comparing the quality of the filtration between these filters. Having to replace a filter every couple of months at a cost of €10 is a major downside. In fact, the advertised life of their filters is 150 litres when used with UK tap-water. If a family of five is filtering 10 litres a day then this filter is only recommended to last two weeks according to the website. This is clearly a fashion filter sold by marketers and not targeted at people who think about the actual quality of the filtration and the ongoing costs.
The filter has not been tested for the removal of pathogens. It is therefore unlikely to remove them. I would not trust this filter except when boiling water first, in a situation where the water supply is contaminated.
Reverse Osmosis
Summary
- Requires power
- Nutrients need adding
- Exceptional filtration
A reverse osmosis filter is suitable for extracting pure water from any water source. It is suitable for the desalination of salt water and for use with any external water source such as wells, lakes and streams.
Reverse osmosis is used by submarines to provide drinking water for the crews and allows the mission duration to be extended for as long as the food lasts.
The problem for us preppers, is that it requires power. Our power cannot be guaranteed, as we do not have nuclear reactors in our basements (at least I hope not 😎). The only way I could trust reverse osmosis would be if I had at least three sources of power generation. As I don’t have that, it is not an option for me, but for some homesteaders and preppers, it could be a great solution. Bear in mind that extra nutrients need to be added to the water and this can be done with pre-prepared sachets, or through the use of some cartridges from the manufacturer, but probably a sprinkle with Himalayan salt would also do the trick.
A DIY Berkey
All the above was really an introduction to part two of this article. Here I’ll describe how I built a DIY Berkey filter that can be used on a daily basis.
Normal cost - €532
- Berkey filter cartridges - €204
- Berkey container - €197
- Stainless steel water view spigot - €79
- Stand - €52
DIY cost - €239 (almost €300 savings!)
- Berkey filter cartridges - €204
- Ikea water dispenser - €15
- Ikea stand - €5
- Used spaghetti pan €15
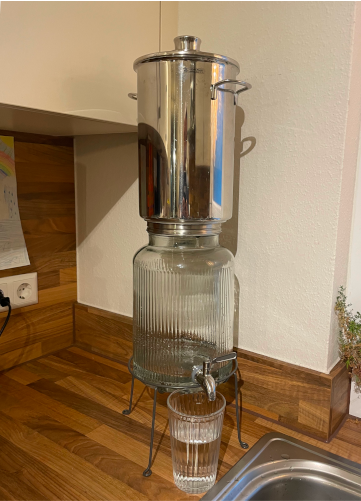
To start with I’ll describe the parts. I used original Black Berkey filters from this European distributor. I’m not trusting Terracotta pots, or a bucket of sand, and I certainly wouldn’t place either of those in my kitchen to serve water to my guests.
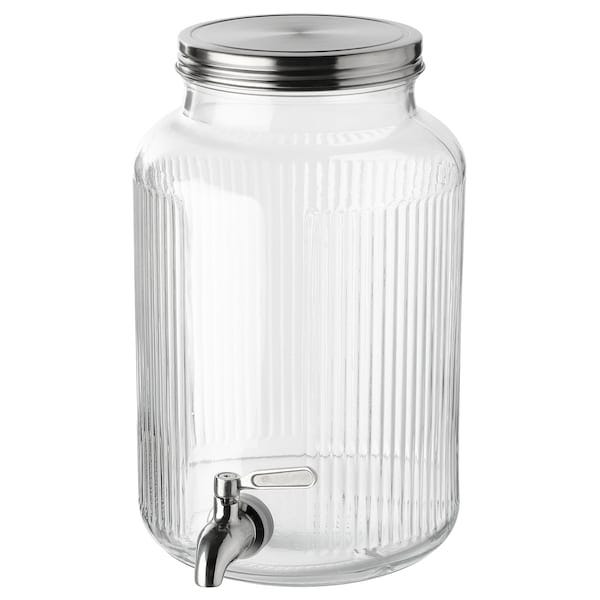
For the dispenser, I like the look of glass drinks dispensers. Many people have them for serving punch if they have guests over. They can be found cheaply at Ikea throughout Europe. Or slightly more expensive variations can be found at other stores. This dispenser is 5 litre clear glass so the water level can be seen at all times. This may mean that algae can grow if left standing for a while but there shouldn’t be any to grow. We wash it every few months anyway. You’ll also notice that it comes with a stainless steel spigot! Some of the ones on Amazon or other shops are only plastic. Also worth noting is that the lid is flat and wide. The lid and neck should be at least 10cm wide. The accompanying stand is a mere £2.50 or €5.
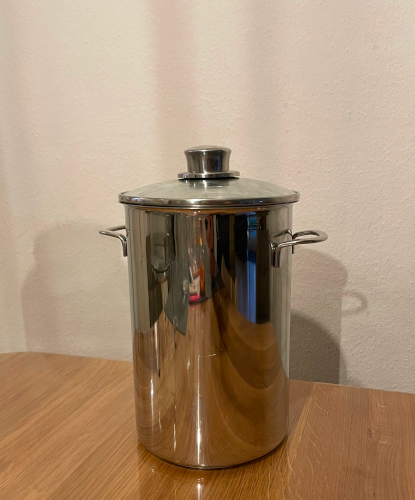
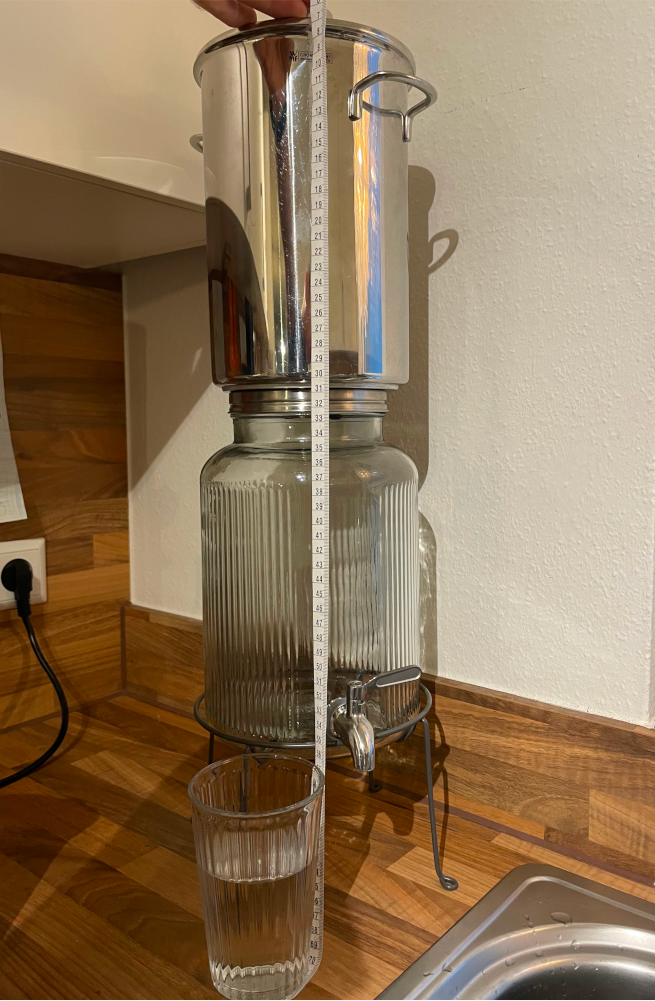
Now for the item that made it all possible. This is called a spaghetti (or pasta) pan or in Germany it is called a Spargeltopf because the Germans love their Asparagus! These pans vary slightly in dimensions but are usually about 16cm diameter and 28cm tall and made from stainless steel. Those dimensions are exactly what we need. And the fact that it’s stainless steel means that even if the dispenser breaks we should still be able to filter water. In Germany these pans are often available used. I paid €15 for ours.
I already had a powerdrill and stepped drill bit. If you don’t have a stepped drill bit then I’d definitely recommend it. These are available from DIY stores for less than €10.
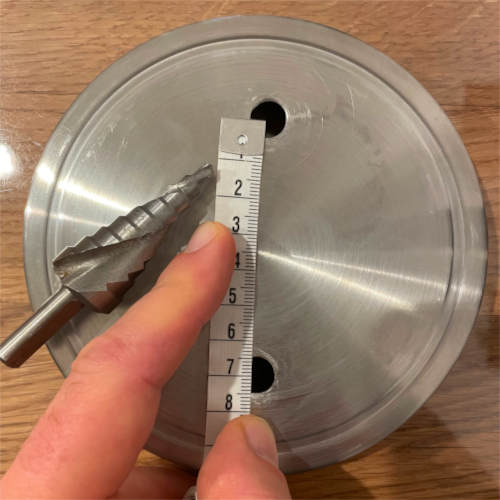
Start by drilling two holes (10-12mm) into the lid about 7cm apart. 7cm is important because if the filters are too close then they will touch and if too far apart then they may not fit inside the pan. You can see in the image later that 7cm is about perfect for my size pan. The 10mm holes allow the filter ends to pass through but it can be a little tight whereas 12mm would be a loose fit. The problem we’ve found with the tight fit is that when removing the filters you may turn the filter to get it out and that can damage the thread.
Drilling into the lid is easy but drilling into the stainless steel pan is a little more difficult. You want to line up the holes exactly with those on the lid. You can mark where to drill with a centre-punch if you have one, or a hammer and nail could also work. Then drill slowly. When you drill too fast then the blade will become blunt so just apply plenty of pressure and let the drill bit do its work. It’s been a few months since I did this, I think I did drill a 2mm pilot hole first, that will allow the stepped bit to catch the sides and then work more quickly.
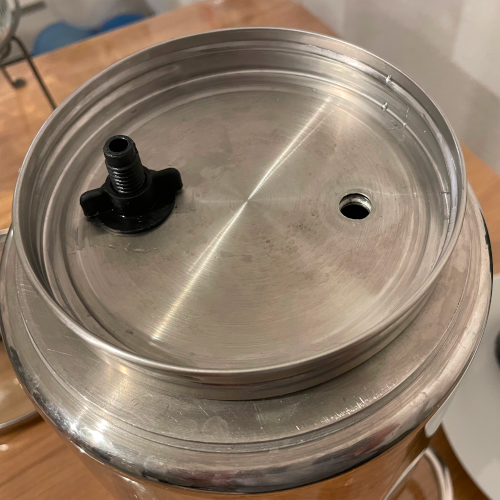
Once all holes are drilled tidy them up with a deburrer or simply a file or a bigger drill bit. Then place the lid and pan together and push the filter through and fasten it in place. Make sure that the rubber washer is on the inside of the pan. Make it fairly tight but do not over-tighten.
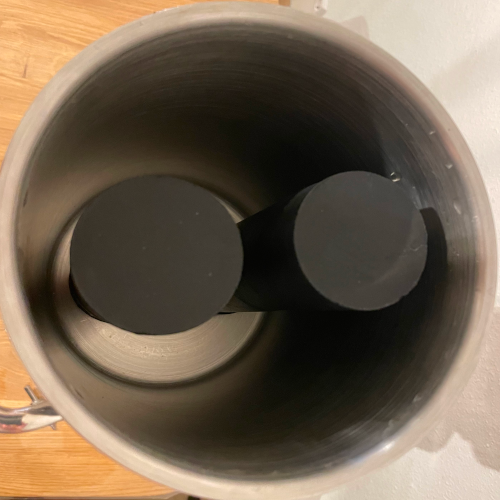
You can see that the filters have a good amount of space all around and we can still fit about 3 litres of water inside. For our family we end up filling it about three times a day. It is recommended to always fill to the top so that the filters are regularly submersed.
The finished product including pan lid is 70cm which is too big to fit under kitchen cupboards. We leave it beside the sink for easy filling and accept that one cupboard won’t open fully.
It does look a bit quirky but so too does a full-price Big Berkey. I think filter manufacturers are missing a trick here because if they made half-size cartridges then the complete filter systems could be made more easily to fit under kitchen cupboards.
Outro If you’ve found this content useful then do subscribe. I don’t send spam and only write articles once per week at the most. If you want to ask questions more privately then there is a Telegram group at https://t.me/greatdeceptionchat or send me an email after you’ve subscribed.
Please subscribe to follow receive my updates.
If you want to support this new work, volunteer some time, or simply keep track of what we’re doing then please subscribe.